| Author | |
VanessaVH
Forum Pro


Joined: July 26 2008
Online Status: Offline
Posts: 224
|
| Posted: Jan 10 2011 at 2:10pm | IP Logged
|
 |
|

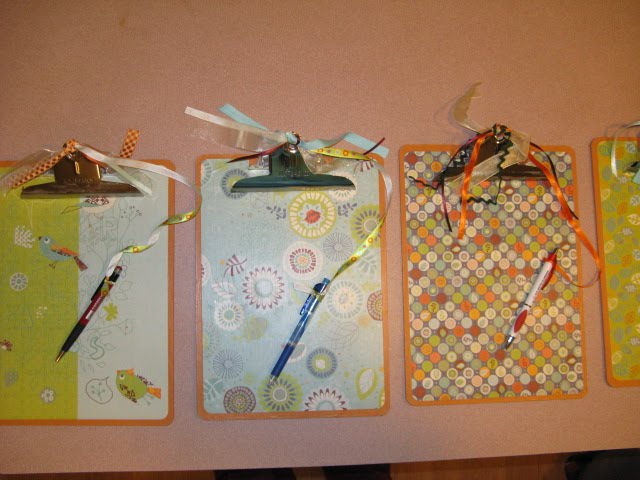
clipboards
__________________
Wife to Mark, Mommy to 4 boys:Luke '05, Eric '07, Nicholas '09 Nathaniel '11
http://butterflyandbullfrogs.blogspot.com/
|
| Back to Top |


|
| |
MaryM
Board Moderator


Joined: Feb 11 2005
Location: Colorado
Online Status: Offline
Posts: 13104
|
| Posted: Jan 10 2011 at 2:51pm | IP Logged
|
 |
|
Those are so pretty, Vanessa!
__________________
Mary M. in Denver
Our Domestic Church
|
| Back to Top |


|
| |
mamaslearning
Forum All-Star


Joined: Nov 12 2007
Location: N/A
Online Status: Offline
Posts: 927
|
| Posted: Jan 10 2011 at 2:54pm | IP Logged
|
 |
|
Those are very pretty.
__________________
Lara
DD 11, DS 8, DS 6, DS 4
St. Francis de Sales Homeschool
|
| Back to Top |


|
| |
VanessaVH
Forum Pro


Joined: July 26 2008
Online Status: Offline
Posts: 224
|
| Posted: Jan 10 2011 at 2:56pm | IP Logged
|
 |
|
Thanks! I had a lot of fun making them :-) I modge-podged scrapbook paper onto the fronts and back, then tied ribbons onto the top.
I would love to hear/see how others are using clipboards, binders etc. to get organized 
__________________
Wife to Mark, Mommy to 4 boys:Luke '05, Eric '07, Nicholas '09 Nathaniel '11
http://butterflyandbullfrogs.blogspot.com/
|
| Back to Top |


|
| |
AmandaV
Forum All-Star

Joined: Aug 27 2009
Location: Texas
Online Status: Offline
Posts: 707
|
| Posted: Jan 10 2011 at 4:13pm | IP Logged
|
 |
|
Can I ask how much it ended up costing to make those? I could not spend the price of those etsy ones, at least any time soon!
|
| Back to Top |


|
| |
VanessaVH
Forum Pro


Joined: July 26 2008
Online Status: Offline
Posts: 224
|
| Posted: Jan 10 2011 at 7:05pm | IP Logged
|
 |
|
Short answer: around $5.00 each.
Long Answer:
The clip boards were 1.99 each from Office Max. I used one piece of 12x12 scrapbook paper for each side (I believe I purchased them on sale for .25, but I think normally are around .80) The Modge Podge was 5.00 at the grocery store (might be cheaper at the craft store, but did't have time to go there this week....)I used less than a bottle on all 5 of them. The ribbons were from my stash, so I can't say how much, (I save ribbons from packaging etc so some might have even been free!) I would guess if I bought 4 different rolls around $1-2 you would have more than enough. Pens/pencils were just around the house. Paint was from the gallon we are currently using to redo the bathroom (the edges were painted before I modge-podged the paper on)
__________________
Wife to Mark, Mommy to 4 boys:Luke '05, Eric '07, Nicholas '09 Nathaniel '11
http://butterflyandbullfrogs.blogspot.com/
|
| Back to Top |


|
| |
VanessaVH
Forum Pro


Joined: July 26 2008
Online Status: Offline
Posts: 224
|
| Posted: Jan 10 2011 at 7:08pm | IP Logged
|
 |
|
Here is a link to the site I found with the best directions
Live to Learn
__________________
Wife to Mark, Mommy to 4 boys:Luke '05, Eric '07, Nicholas '09 Nathaniel '11
http://butterflyandbullfrogs.blogspot.com/
|
| Back to Top |


|
| |
TxTrish
Forum Pro


Joined: Oct 23 2005
Location: Pennsylvania
Online Status: Offline
Posts: 321
|
| Posted: Jan 12 2011 at 1:55pm | IP Logged
|
 |
|
I don't know about the rest of the ladies,
but I could do this project for free.....
right now!
I have always bought clipboards when I saw them at the Goodwill or garage sales (or whatever) for around .50 cents or less each. That way we always have them when we need them for this and that.
Scrapbook paper, the glue, ribbons
check, check, check.
I have reached the point (my eldest child is 19) where I rarely have to purchase supplies.
Years of purchasing school supplies at the back to school sales, and keeping my eye out for bargains and "supplies" of all sorts at the thrift/garage/rummage sales (or trash piles on the corner on trash day) means I have a ready stock of pretty much anything I need. I also keep my ears open for all the gimmies, people asking could you use _____. It works out pretty well - I can usually really chip in supply wise for different things we do with projects in clubs, Little Flowers and stuff like that.
I suppose this is only useful if you have the organizational skills, time and space to store it.
A good memory helps too, I hate it when I purchase something I already have!
+JMJ+
__________________
+JMJ+
Gabrielle20, Deavon18, Elizabeth12, Mary10, Greg8
and a grandson!
My Blog
"Duty before everything, even something holy"
St.Padre Pio
|
| Back to Top |


|
| |
TxTrish
Forum Pro


Joined: Oct 23 2005
Location: Pennsylvania
Online Status: Offline
Posts: 321
|
| Posted: Jan 12 2011 at 1:56pm | IP Logged
|
 |
|
And Vanessa - lovely!
__________________
+JMJ+
Gabrielle20, Deavon18, Elizabeth12, Mary10, Greg8
and a grandson!
My Blog
"Duty before everything, even something holy"
St.Padre Pio
|
| Back to Top |


|
| |
kingvozzo
Forum All-Star


Joined: March 28 2005
Location: Maine
Online Status: Offline
Posts: 2653
|
| Posted: Jan 12 2011 at 9:00pm | IP Logged
|
 |
|
Ok, so I've tried this 2x, the first time using tissue paper. That was tricky, but came out pretty well. because of the thinness of the tissue paper, the background is still pretty dark. But, any bubbles or bumpy spots are pretty minor because it's so thin.
The second time (tonight) I tried it with some scrapbooking paper I found. I used 4 pieces of 3x5 paper. It came out pretty bubbly...clearly, my application technique needs some work  The bubbles are much more noticeable on the 2nd board because of the thicker paper. The bubbles are much more noticeable on the 2nd board because of the thicker paper.
My oldest (son) wants to do his clipboard. We'll be going to the craft store at some point to get some more "manly" paper  . Hopefully the third time will be a charm! . Hopefully the third time will be a charm!
__________________
Noreen
Wife to Ed
Mom to 4 great kids and 10 sweet ones in Our Lady's arms
|
| Back to Top |


|
| |
AmandaV
Forum All-Star

Joined: Aug 27 2009
Location: Texas
Online Status: Offline
Posts: 707
|
| Posted: Jan 12 2011 at 9:12pm | IP Logged
|
 |
|
Thanks for the info, Vanessa! I'm not really a scrapbooker, so I might have to get some supplies next time I'm out and try this. Very cute!
|
| Back to Top |


|
| |
MaryM
Board Moderator


Joined: Feb 11 2005
Location: Colorado
Online Status: Offline
Posts: 13104
|
| Posted: Jan 12 2011 at 9:37pm | IP Logged
|
 |
|
kingvozzo wrote:
The second time (tonight) I tried it with some scrapbooking paper I found. I used 4 pieces of 3x5 paper. It came out pretty bubbly...clearly, my application technique needs some work  |
|
|
It could be that the application method does affect it. Vanessa, how did you apply yours to make sure it was smooth and bubble free?
Noreen, did you use Modge Podge or a regular white glue? Modge Podge does make a difference. The other thing with the thicker paper is you can "squeegee" it with a flat edge (ruler, side of pencil, etc.) once applied to make sure you pull the bubbles out.
__________________
Mary M. in Denver
Our Domestic Church
|
| Back to Top |


|
| |
Mackfam
Board Moderator


Non Nobis
Joined: April 24 2006
Location: Alabama
Online Status: Offline
Posts: 14656
|
| Posted: Jan 12 2011 at 10:06pm | IP Logged
|
 |
|
LOVE your clipboards, Vanessa! They're gorgeous!!!    
MaryM wrote:
kingvozzo wrote:
The second time (tonight) I tried it with some scrapbooking paper I found. I used 4 pieces of 3x5 paper. It came out pretty bubbly...clearly, my application technique needs some work  |
|
|
It could be that the application method does affect it. Vanessa, how did you apply yours to make sure it was smooth and bubble free?
Noreen, did you use Modge Podge or a regular white glue? Modge Podge does make a difference. The other thing with the thicker paper is you can "squeegee" it with a flat edge (ruler, side of pencil, etc.) once applied to make sure you pull the bubbles out.
|
|
|
When I've done similar projects, we have our best success using Modge Podge and then we place an old dishtowel over the surface and take a rolling pin, or even a sort of squishable, bendable rubber spatula and smoosh from the center out. I've only ever used thicker, scrapbook weight paper though. Also...we followed the same principle as one does in applying ceramic tile - back buttering! So...one of us lightly paints the surface of the paper, and another lightly paints the surface of the board and then apply them together. They stick together better that way. Foam applicators work well with Modge Podge.
__________________
Jen Mackintosh
Wife to Rob, mom to dd 19 , ds 16 , ds 16 , ds 11 , ds 11 , dd 8 , dd 8 , and dd 3 , and dd 3
Wildflowers and Marbles
|
| Back to Top |


|
| |
kingvozzo
Forum All-Star


Joined: March 28 2005
Location: Maine
Online Status: Offline
Posts: 2653
|
| Posted: Jan 12 2011 at 10:40pm | IP Logged
|
 |
|
MaryM wrote:
Noreen, did you use Modge Podge or a regular white glue? Modge Podge does make a difference. The other thing with the thicker paper is you can "squeegee" it with a flat edge (ruler, side of pencil, etc.) once applied to make sure you pull the bubbles out.
|
|
|
I did use Modge Podge, but didn't try to squeegee out the bubbles with a flat edge. I'll definitely try that next time. I've done that when using contact paper...
Mackfam wrote:
| Also...we followed the same principle as one does in applying ceramic tile - back buttering! So...one of us lightly paints the surface of the paper, and another lightly paints the surface of the board and then apply them together. They stick together better that way. Foam applicators work well with Modge Podge. |
|
|
So if you 'back butter' you're putting two glue-y edges together? I imagine that makes it slightly easier to reposition slightly if necessary? I'll also try this trick on the next board!
Thanks ladies!
__________________
Noreen
Wife to Ed
Mom to 4 great kids and 10 sweet ones in Our Lady's arms
|
| Back to Top |


|
| |
seeker
Forum Pro

Joined: July 19 2010
Location: Tennessee
Online Status: Offline
Posts: 186
|
| Posted: Jan 13 2011 at 8:20am | IP Logged
|
 |
|
Mackfam wrote:
| When I've done similar projects, we have our best success using Modge Podge and then we place an old dishtowel over the surface and take a rolling pin, or even a sort of squishable, bendable rubber spatula and smoosh from the center out. I've only ever used thicker, scrapbook weight paper though. Also...we followed the same principle as one does in applying ceramic tile - back buttering! So...one of us lightly paints the surface of the paper, and another lightly paints the surface of the board and then apply them together. They stick together better that way. Foam applicators work well with Modge Podge. |
|
|
A trick we used in design school regarding the "back buttering" technique:
Using rubber cement (if you can stand it) paint both sides lightly - then: let it dry before putting the sides together. Sounds like it wouldn't work, and I doubt it would with regular glue, but with the rubber cement it's fantastic! It really puts the cement in the name rubber cement! We used to do this with spray adhesive as well, but I don't think I'd use spray adhesive on this project...
|
| Back to Top |


|
| |
Grace&Chaos
Forum All-Star


Joined: June 07 2010
Location: California
Online Status: Offline
Posts: 1261
|
| Posted: Jan 13 2011 at 9:27am | IP Logged
|
 |
|
Vanessa, these are great! Thanks for the instruction link. I definitely want to try this with some "boyish" scrapbook paper. They are constantly looking for hard surfaces in carpeted or rug areas. Clipboards would help  . .
I have all the materials minus the Modge Podge: have to wait till the weekend.
Thanks for the tips on the bubbling too.
__________________
Blessings,
Jenny
Mom to dds(00,03) and dss(05,06,08,09)
Grace in Loving Chaos
|
| Back to Top |


|
| |
TxTrish
Forum Pro


Joined: Oct 23 2005
Location: Pennsylvania
Online Status: Offline
Posts: 321
|
| Posted: Jan 13 2011 at 9:45am | IP Logged
|
 |
|
There is a tool called a "brayer" (spelling might be wrong) that is a mini rolling pin kinda thingy that you can use when doing decoupage to get all the air bubble out for a smooth surface. I have one, but still most often use my fingers, or entire hand if doing a large piece (like furniture). A pin to poke any stubborn bubbles is invaluable, too.
The other best trick for decoupage when doing a larger surface (like the clipboards) is this.....
"Relax" your paper before applying it to the glued surface. Relax your paper by completely getting it wet. Like in the kitchen sink. You just fill with a couple inches of water, and let it soak for a minute until the paper is soaked and 'relaxes'. This will allow the paper to 'stretch' prior to being glued to the surface. It is tricky and takes some practice, but once you get the hang of it - the results are amazing.
I did a shelving unit for my father, he displays his Nascar Collection on the shelves (he built specially for this) - I decoupaged some old Nascar posters that had hung in his shop, and added tickets from races and other memorobilia he's collected over the years onto the backing part of the shelves. It looks really nifty with the cars on the shelves and all that stuff on the back.
Also, when doing decoupage, several lighter coats of the glue is better than one big heavy one.
__________________
+JMJ+
Gabrielle20, Deavon18, Elizabeth12, Mary10, Greg8
and a grandson!
My Blog
"Duty before everything, even something holy"
St.Padre Pio
|
| Back to Top |


|
| |
VanessaVH
Forum Pro


Joined: July 26 2008
Online Status: Offline
Posts: 224
|
| Posted: Jan 13 2011 at 10:17am | IP Logged
|
 |
|
I applied Modge Podge to the clipboard, smoothed the paper on with my fingers and tried to get all the bubbles out starting at the middle, then applied the Modge Podge on top, but I still had a few bubbles.... I think I will try the paper relaxing next time, that seems like a really good idea, and using a flat edge or brayer seems like it would help too!
__________________
Wife to Mark, Mommy to 4 boys:Luke '05, Eric '07, Nicholas '09 Nathaniel '11
http://butterflyandbullfrogs.blogspot.com/
|
| Back to Top |


|
| |
MaryM
Board Moderator


Joined: Feb 11 2005
Location: Colorado
Online Status: Offline
Posts: 13104
|
| Posted: Jan 13 2011 at 10:46am | IP Logged
|
 |
|
seeker wrote:
| Using rubber cement (if you can stand it) paint both sides lightly - then: let it dry before putting the sides together. Sounds like it wouldn't work, and I doubt it would with regular glue, but with the rubber cement it's fantastic! It really puts the cement in the name rubber cement! We used to do this with spray adhesive as well, but I don't think I'd use spray adhesive on this project... |
|
|
I do use this technique with Rubber Cement paper on paper, but have trouble with plastics. I think it might not hold well on the plastic clip boards that I see in the pictures - though it should on the chipboard ones.
__________________
Mary M. in Denver
Our Domestic Church
|
| Back to Top |


|
| |
seeker
Forum Pro

Joined: July 19 2010
Location: Tennessee
Online Status: Offline
Posts: 186
|
| Posted: Jan 13 2011 at 11:08am | IP Logged
|
 |
|
MaryM wrote:
| I do use this technique with Rubber Cement paper on paper, but have trouble with plastics. I think it might not hold well on the plastic clip boards that I see in the pictures - though it should on the chipboard ones. |
|
|
Mary, yes, I was thinking of the chipboard clipboards... I should have clarified that better. We used to use the technique to adhere vellum, drafting paper, and brown craft paper to foam core... made for awesome looking presentations.
|
| Back to Top |


|
| |


 Topic: Clipboard Spin-Off Thread


 The bubbles are much more noticeable on the 2nd board because of the thicker paper.
 . Hopefully the third time will be a charm!


 , ds 16
